To fix the issue, follow the steps:(for win XP)


3.Or else just uninstall the antivirus and check by restarting the computer.(also uninstall unwanted softwares from the programs and features)
4.If it is not fixed, perform the System restore to the earlier date in which the computer was working fine.
To perform SYSTEM RESTORE:
- Close all programs so that you have nothing open and are at the desktop.
- Click on the Start button then click on Run.
- In the Run field type ‘msconfig’ as shown in the image below.
Press the OK button and the System Configuration Utility will start up.
You should now click on BOOT.INI tab designated by the red box in the figure above and you will see a screen similar to image below.
Uncheck the mark in the checkbox labeled "/SAFEBOOT" designated by the red box above. Then press the OK button and then the OK button again. Windows will now prompt if you would like to reboot. Press the Yes button and machine should now be able to boot into normal mode.
Note: With "/SAFEBOOT" option checked you will notice an additional entry in Boot.ini file as seen below. If you see the box check for/SAFEBOOT remove the check.
This applies to Windows Vista, Windows Server 2008, Windows 7 and Windows Server 2008 R2.
On the Operating System running Vista or above Boot Configuration Data Editor (Bcdedit.exe) command-line tool can be really handy:
Following command will delete the “/SAFEBOOT” option and help machine boot into normal mode:
bcdedit /deletevalue {default} safeboot
Open administrative command prompt to run above bcdedit command. For detailed command and option information at the command prompt, type bcdedit.exe /? command.
If the above steps soesn't resolve the issue,
1. Check whether any expired antivirus is installed in your computer.
2.If so, uninstall the expired antivirus software from the computer.
4.If it is not fixed, perform the System restore to the earlier date in which the computer was working fine.
To perform SYSTEM RESTORE:
- Navigate to the Start -> All Programs ->Accessories -> System Tools program group.Click on the System Restore program icon.Click Next > on the Restore system files and settingswindowChoose the restore point that you want to use.

 Note: Check the Show more restore points checkbox to see more than the most recent restore points.Note: Any restore points that you created, scheduled restore points that Windows 7 created, and those created automatically during the installation of certain programs will be listed here. You can not use System Restore to undo Windows 7 changes to a date that a restore point does not exist.
- Click Next >.
- Click Finish on the Confirm your restore point window to begin the System Restore.Note: Windows 7 will shut down to complete the System Restore so be sure to save any work you might have open in other programs before continuing.Important: System Restore will not revert any of your non-system files like documents, email, music, etc. to a previous state. These types files are completely unaffected by System Restore. If your intention with this tool was to recover a deleted non-system file, try using a file recovery program instead of System Restore.
- Click Yes to the Once started, System Restore cannot be interrupted. Do you want to continue? dialog box.
- System Restore will now restore Windows 7 to the state that was recorded in the restore point you chose in Step 4.Note: The System Restore process could take several minutes as you see the "Please wait while your Windows files and settings are being restored" message. Your computer will then reboot as normal when complete.
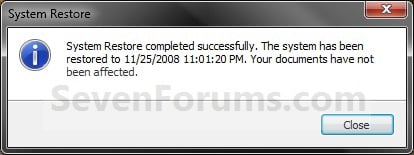
- Immediately after logging in to Windows 7 after the reboot, you should see a message that System Restore completed successfully.
- Click Close.
- Check to see if whatever Windows 7 problem you were troubleshooting has been corrected by this System Restore.If the problem still persists, you can repeat the steps above and choose another restore point if one is available.If this restoration caused a problem, you can always undo this particular System Restore.
No comments:
Post a Comment