Monday, 29 July 2013

unable to boot the computer in normal mode

To fix the issue, follow the steps:(for win XP)


  1. Close all programs so that you have nothing open and are at the desktop.
  2. Click on the Start button then click on Run.
  3. In the Run field type ‘msconfig’ as shown in the image below.

  Press the OK button and the System Configuration Utility will start up.


You should now click on BOOT.INI tab designated by the red box in the figure above and you will see a screen similar to image below.

Uncheck the mark in the checkbox labeled "/SAFEBOOT" designated by the red box above. Then press the OK button and then the OK button again. Windows will now prompt if you would like to reboot. Press the Yes button and machine should now be able to boot into normal mode.

Note: With "/SAFEBOOT" option checked you will notice an additional entry in Boot.ini file as seen below. If you see the box check for/SAFEBOOT remove the check. 


This applies to Windows Vista, Windows Server 2008, Windows 7 and Windows Server 2008 R2. 


On the Operating System running Vista or above Boot Configuration Data Editor (Bcdedit.exe) command-line tool can be really handy:
Following command will delete the “/SAFEBOOT” option and help machine boot into normal mode:
bcdedit /deletevalue {default} safeboot
Open administrative command prompt to run above bcdedit command. For detailed command and option information at the command prompt, type bcdedit.exe /? command.

If the above steps soesn't resolve the issue, 

1. Check whether any expired antivirus is installed in  your computer.

2.If so, uninstall the expired antivirus software from the computer.

3.Or else just uninstall the antivirus and check by restarting the computer.(also uninstall unwanted softwares from the programs and features)

4.If it is not fixed, perform the System restore to the earlier date in which the computer was working fine.

To perform SYSTEM RESTORE:

  1. Navigate to the Start -> All Programs ->Accessories -> System Tools program group.
    Click on the System Restore program icon.
    Click Next > on the Restore system files and settingswindow
    Choose the restore point that you want to use.
    System Restore-after_reboot.jpg
    Note: Check the Show more restore points checkbox to see more than the most recent restore points.
    Note: Any restore points that you created, scheduled restore points that Windows 7 created, and those created automatically during the installation of certain programs will be listed here. You can not use System Restore to undo Windows 7 changes to a date that a restore point does not exist.

    1. Click Next >.
    2. Click Finish on the Confirm your restore point window to begin the System Restore.
      Note: Windows 7 will shut down to complete the System Restore so be sure to save any work you might have open in other programs before continuing.
      Important: System Restore will not revert any of your non-system files like documents, email, music, etc. to a previous state. These types files are completely unaffected by System Restore. If your intention with this tool was to recover a deleted non-system file, try using a file recovery program instead of System Restore.
    3. Click Yes to the Once started, System Restore cannot be interrupted. Do you want to continue? dialog box.
    4. System Restore will now restore Windows 7 to the state that was recorded in the restore point you chose in Step 4.
      Note: The System Restore process could take several minutes as you see the "Please wait while your Windows files and settings are being restored" message. Your computer will then reboot as normal when complete.
    5. Immediately after logging in to Windows 7 after the reboot, you should see a message that System Restore completed successfully.
    6. Click Close.
    7. Check to see if whatever Windows 7 problem you were troubleshooting has been corrected by this System Restore.
      If the problem still persists, you can repeat the steps above and choose another restore point if one is available.
      If this restoration caused a problem, you can always undo this particular System Restore.


Volume icon greyed out in Windows

The VOLUME in Sytem icons is grayed out.


1. Perform SFC scan using the command prompt.

2.Enter "cmd" in the start and right click on the "cmd" and click on "Run as administrator"
 and type the following command sfc /scannow and press enter.

 3.Once the scan gets completed , Reboot your computer.

If the issue is not fixed, then follow the below steps:


1. Click on “Start”
2. Enter “gpedit.msc” into the search field and click on “gpedit.msc” at the bottom when it appears.
3. In the left pane, uncollapse the folders “Administrative Templates” and then “Start Menu and Taskbar”
Windows 7 Group Policy Editor
4. Scroll down in the right pane until you find the entries:
Remove System Icons Windows 7
  • Remove the Action Center icon
  • Remove the networking icon
  • Remove the battery meter
  • Remove the volume control icon
5. Double-click on “Remove the Action Center icon”

6. On the following window, check the option “Disabled”:

Remove the Volume Control Icon Windows 7
7. Click on Apply and then on “OK”.
8. Repeat the same for the other entries “Remove the networking icon”, “Remove the battery meter”, “Remove the volume control icon”.
9. Reboot the computer.
This will fix the issue.


The user profile service failed the logon. User profile cannot be loaded

http://answers.microsoft.com/en-us/windows/forum/windows_7-security/i-receive-error-message-the-user-profile-service/38844b82-a2c1-4fa2-9802-a5318d6f7831

Please refer the above link to resolve this issue.

1. Restart your computer and hit F8 multiples times until you see a menu-like screen, if you see the Windows splash screen then repeat this step
2. Highlight and hit enter on Safe Mode with Command Prompt. Try logging in there. If it still doesn't work, then go to step17
3. If you are able to login, once a command prompt pops up, type: net user administrator password/active:yes (you can specify whatever password you want for the administrator account.)
4. If you get a message saying "The command completed successfully", then restart your computer by typing: shutdown -r
5. Boot up again pressing F8, but this time choose just Safe Mode.
6. You will be able to login as Administrator with the password you set in Step 3
7. Hit (windows logo)+R
8. Type regedit
9. Once the registry editor opens up, look for HKEY_LOCAL_MACHINE\SOFTWARE\Microsoft\Windows NT\CurrentVersion\ProfileList
10. In the left pane, find the one that starts with S-1-5..... and ends with .BAK; if you don't find one, skip to step 15
11. Right click it and click Rename, then change the .BAK to .BK
12. Right click the one with the same numbering but without the .BAK and add .BAK add the end
13. Right click the one that you renamed to .BK and clickRename, delete the .BK
14. Eventually, you have switched the .BAK from the end of the second entry to the first. That should probably fix your problem.
15. If you didn't find a .BAK then try this: Open Windows Explorer to C:\Users\Default\AppData\Local\Application Data
16. If you find another Application Data below the one you're on, then delete it. That should probably also fix your problem.
17. If you can't login in Safe Mode, then reboot and hit F8 until you see the menu again, then hit enter highlightingRepair Your Computer
18. Wait until all Windows Files finish loading, then hitNext when it asks keyboard language.
19. Try logging in here also, choose your user from the dropdown menu, and type the password, then jump to step 23
20. If that still doesn't work, then if you have your Windows Installation CD still, put it in and restart your computer.
21. Hit F12 until you see a menu of boot options, choose Boot from CD
22. Choose keyboard language then hit next. Find Repair Your Computer from a little below the center left.
23. Choose Open Command Prompt and type: net user administrator password /active:yes (here again you can specify a password)
24. Close the command prompt and click Restart and jump to step 5

To disable the administrator account, type this in an elevated command prompt: net user administrator /active:no

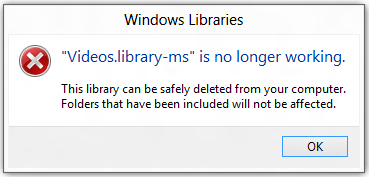
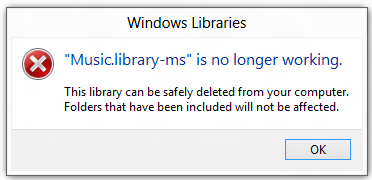
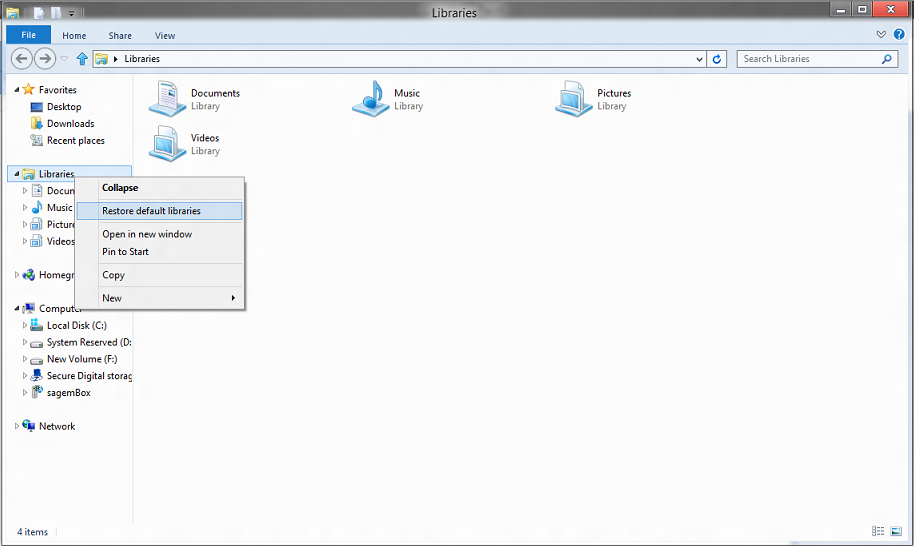
video.library-ms is no longer working in windows 8. This library can be safely deleted from your computer. Folders that have been included will not be affected.

This can be used for all Pictures and Music files not working issue.


Step 1: Close the warning message window and click on Windows Explorer folder on the Taskbar - below your screen.


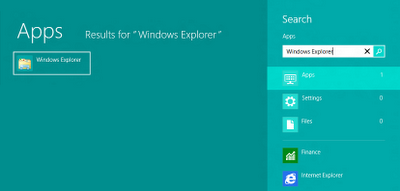
Step 2: Or move the mouse cursor to the extreme right-hand side to lower corner of the computer and select search icon from the options to the right-hand side of your screen.


Step 3: At  'Run'  type Windows Explorer and press ENTER to open the Library folder.


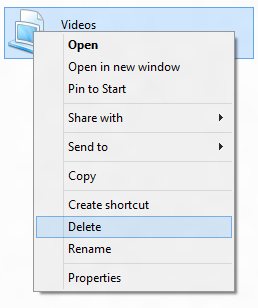
Step 4: Locate ' Videos' library and right-click on it.
Step 5: Select 'Delete' to delete the videos library from the folder.


Step 6: Move the mouse cursor to the left-hand side of the window and right-click on Library.

Step 7: Select 'Restore default libraries' and press ENTER .  

Note:

Follow the similar steps with the Music files and documents if it is not working.


Monday, 22 July 2013

changing Flash player storage settings

http://www.macromedia.com/support/documentation/en/flashplayer/help/settings_manager07.html

You can change the flash player storage settings by using the above link..............


Error: “5013,3″ appears on my Norton 2011 product

  1. Click the Start button, and then click All Programs > Accessories > Run.
  2. In the Run dialog box, type the following text:
    services.msc
  3. Click OK.
    If you receive the User Account Control prompt, click Yes or Continue.
  4. In the Services window, under the Name column, locate and double-click Base Filtering Engine.
  5. To the right of Startup type, verify that Automatic appears.
    If Startup type is not Automatic, then in the drop-down list, click Automatic.
  6. To the right of Service Status, verify that Started appears.
    If the Service status is not Started, then click Start.
  7. Click OK.
  8. Exit the Services window.
  9. Restart the computer.

If the above one is not working try the following registry Fix.
Registry editing for Turn On the Base Filtering Engine.
Save the file on your desktop.  Rename the file as  BFE.reg
Open the Registry Run-->Type REGEDIT and press on Ok.
Now you will get a Registry Editor. Click on the File Menu in the Registry Editor and press on Import. Locate the file BEF.reg on the desktop. Press on Open. –> Yes -> Ok.

Now restart the computer. After that go to the registry once again and go to the location
HKLM\System\Current control set\services\BFE
Right Click  –> Permission  –>  Advance   –>  Add — > Everyone
Now restart the computer. The issue will be fixed now.

Error: "5013,3" appears on Norton 360 Version 5.0

1.Enable the Base Filtering Engine service by using the command services.msc and look for the Base Filtering Engine service and enable the service.

2.
post-1009-1269794715.gif


If you are still having trouble finding the service (on an XP SP2 or later system), please run a SFC scan.


3. Click on START and type in cmd in the Start search box at the bottom of the Start menu. 

4.  Right click on the cmd.exe at the top of the find list (where all the program short cuts used to be listed) and select "Run as administrator" . In the User Account Control click "continue".

5. In the new Command Prompt window  Type SFC /SCANNOW and press ENTER.

6. Once this is finished, reboot your system. 

7.Then try and find the service again.